Sunday, March 11, 2012

ScratchArt


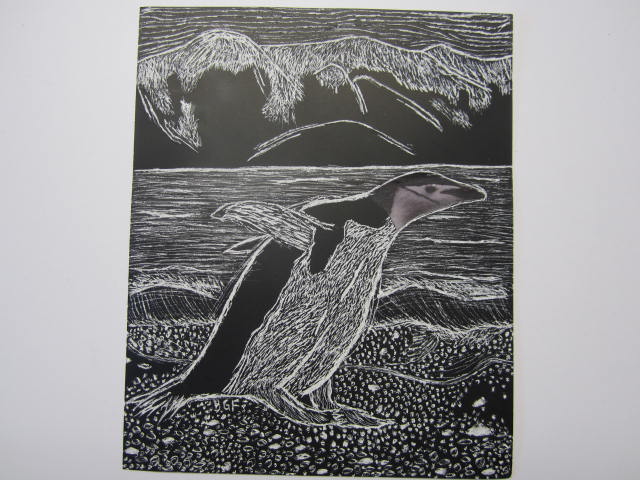
Have been wanting to do a scratch-art lesson for ages, and finally tried it.  My high school students enjoyed it a lot.  I got the idea of starting with a face from Nena at  The Painted Apple.  Her students create marvelous work and I'm so glad she shares it in her blog!

I gave the students magazines and calendars and told them that their subject had to be an animal or a person.  I also showed them my example which was a frog.  Not surprisingly, all of them chose animals.  Then I made a color photocopy of the animal.  They cut
Here are the steps we took:
1.  Draw the whole animal in pencil on scratch paper.  This is the practice drawing.
2. I made color copies of each animal and students cut out ONLY the face of the animal and glued it onto their scratchboard.  (By the way, I was surprised to find that my small local art supply shop sold 24"x36" sheets of scratchboard for $3.00 ea.  I really didn't want to take the time to have the students make their own.)  (Also, by the way, you don't have to make color copies of animals.  I did so because I didn't want the originals ruined by having face cut out.)
3.  Students used edge of paperclip, or toothpick, or side of scissors to scratch the animal and background.  They chose their preferred tool.


Sunday, February 26, 2012

Kinder Socks

(Good gracious!  I found these socks pics and wrote this post.....AND just realized that I already posted this lesson not long ago.  Geeesh, oh well it really was a FUN lesson, so here it is again.)

Big Thanks to Laugh Paint Create and Mrs. Knight's Smartest Artists  for sharing their lessons inspired by the book, A Pair of Socks by Stuart J. Murphy & Illustrated by one of my favorites, Lois Ehlert.
My kinders loved the book and loved making their own "Matching Socks".  They also surprised me with how well they were able to make two identical socks with the same designs.


Wednesday, February 22, 2012

Robert Indiana Sign


This time I decided that students could choose their own 4 letters to highlight in their project inspired by the work of Robert Indiana.  
Students love learning about the iconic "LOVE" below.  The balance of the blue and green.  The slant of the "O".  The way the red letters are all connected to each other without any seams between them.  And the interesting relationship of the "L", "V", and "E" whereas they all touch the edge of the piece, yet the "O" doesn't touch the edge.  Some say the "O" is meant to represent fragility or instability as it looks like it can roll off the picture at any moment.  In opposition the other three letters are solidly placed.


The steps were:
1.  Make 4 big letters on 4 white pieces of paper that were 4.5"x4.5" each.
2.  Collage over the letters with magazine pictures.
3. Glue background construction paper color blocks on 9"x9" paper.
4.  Glue collaged letters onto color blocks.


These were done by beginning High School art students, but it's such a simple lesson younger kids could do it too.

Thursday, February 9, 2012

Doodle Fish

Art Project Girl found a great page in an old art book that had a simple doodle drawing of fish, and I'm grateful she shared it hereSimple always grabs my attention!

Step 1: Loopy doodle ( I told the students no more than 8 loops on the page....you know what would've happened without the limit.)


Step 2:  Add tails and face, then color.


Here are the "Doodle Fish" created by 4th graders.


Enhanced by Zemanta

Tuesday, February 7, 2012

Rock Fish

Rock Fish for 4th Graders!  
I added the exclamation because I'm so excited to finally have some lessons that can be special for particular grade levels.  After years of traveling to many different schools, I'm now at one school and can start some art project traditions at various grade levels.  Last year I chose the 4th grade class to make Rock Fish because the size of the class fit with the number of rocks I'd accumulated. So this year I decided to stick with 4th grade for the Rock Fish, and alas a new tradition has begun.
Big Thanks to MaryMaking for introducing my to this fabulous book, and inspiring this lesson with her salt dough fish lesson.

First we read, Only One You by Linda Kranz.
On paper, the students drew an oval for a rock, then drew a mouth, eye, fins, and decorations.
Then each student took a turn coming up to my box of rocks and choosing their rock.  (I had already painted one side of the rocks with white paint.)
The kids drew on the their rocks with black permanent marker.  Of course they wanted to use pencil first, but I didn't let them because of time constraints and I knew that some would make their decorations too small if they used pencil first.
Then students painted their fish with acrylic paints.
The following week, the students went over their black lines again with permanent marker to make the lines really stand out.
Lastly, I sprayed each one with clear gloss sealer.


Thanks NCCS 4th Graders!