Showing posts with label clay art. Show all posts

Sunday, January 13, 2013

Clay Time....

We're beginning clay projects.  After experimenting with some other brands of air dry clay last year, I'm back to using Crayola Air Dry clay.  It's not so great, but I haven't found any other brand that's reasonably priced and better.

3rd graders are making these cute BUNNIES.  They're hollow in the middle so they can kind of be used as finger puppets too.


2nd graders are making CUPCAKE Boxes.  Next time I need to remember to give kids a ball of clay closer to the size of a golf ball than the size of an apricot for making the bottom of their cupcake.  The walls of clay were thicker than I prefer, hopefully they'll dry okay.


Lots of messy fun ----- a few kids were absent ----  that's one of my biggest challenges in being an art teacher.  So time consuming helping kids get caught up who've been absent.  In the past I worked at a large school, so it was virtually impossible to offer all the time necessary for all the absent kids.  Now I offer make-up arrangements for absent kids.

How do you deal with absent students from your art classes?  Would love to get your ideas.

Saturday, July 7, 2012

Penguin Pots

Have you seen the cute little clay penguins 
floating around Pinterest?

I made them with some of my summer students, and they turned out adorable:)
We just made 2 pinch pots, then added wings and feet to one of them, and beak and eyes to the other.  We used Crayola air dry clay, and acrylic paints.

These cuties were made by 4th & 5th graders.  The one on the left was named "Lulu" & one on the right was named "Bob."


Great job, Ellie & Lauren!!!!

Wednesday, December 29, 2010

"ME" clay boxes

My son's awesome middle school art teacher, Ms. Aird, shared this clay box lesson with me and my students finished their boxes before Christmas.  As I mentioned in an earlier post, we used Crayola Air Dry clay which is not a clay I'd recommend.  It hardens quickly and cracks and crumbles easily - but with all that being said - I think my students did a great job creating fun boxes!!!

Project Goal:  Create a box that has symbols on all 4 sides and on the lid representing your personality.

Step 1:  The students completed a worksheet answering basic questions to give them ideas for the symbols they'd put on the sides of their boxes.  (Questions such as, What do you like to do in your free time? Who are the important people in your life?  Favorite foods? Favorite time of year?, etc.)  And on the bottom of the worksheet, they had to sketch ideas for each side of their box in 3 given rectangles and 2 given squares.  You can see the worksheet in the picture above.

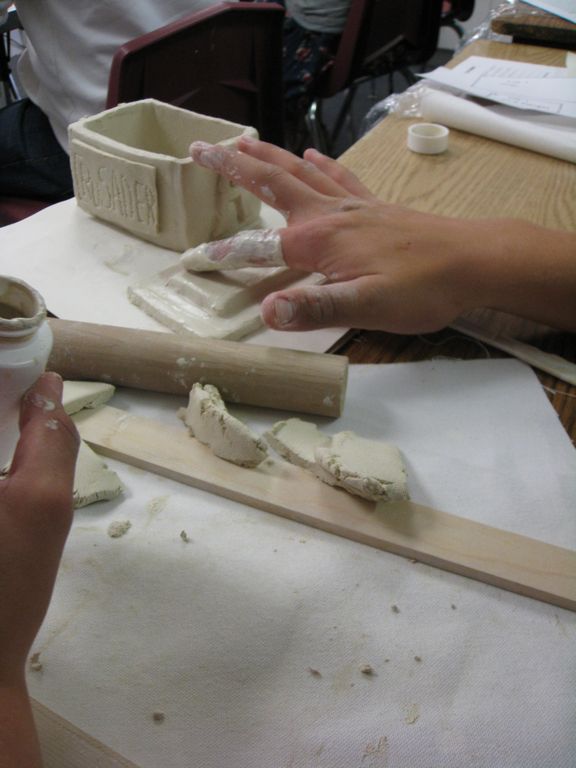
Step 2:  Each student was given a pattern of a rectangle and a square.  Using the pattern, they had to create 4 rectangles, for the bottom - long sides- and lid, and 2 squares for the short sides of the box. We used rails and wooden dowels for creating even slabs for cutting the shapes. (One class also made another small rectangle to attach to the base of the lid so it wouldn't move around and fall off the top of the box.  The other class didn't do this step b/c we ran out of clay and their lids stayed on fine.)

Step 3: Roll skinny snakes of clay to cover up and strengthen all the inside seams of the box.  Four skinny snakes pressed and smoothed into the bottom seams, and 4 more pressed into the side seams.  Use plenty of "slip" to make the seams strong and smooth.  I like to give students small medicine bottles full w/ slip, they're airtight and easy to store for future use.  You can see boy holding one in the picture above.

Step 4: Attach symbols on all four sides of box, they can be 3D or carved in.  Attach 3D symbol on lid to act as handle.  Then paint after dry.  Some of the students didn't slip and score their attached symbols well enough and they fell off, but we glued them back on.  I also sprayed the finished boxes with clear gloss sealer.


Big thanks to North County Christian High School art students!!!

Friday, December 3, 2010

Recycled & Re-usable clay tool

We're working on building some clay boxes, which are turning out really fun.  Hopefully we'll finish next week and I'll post pics.
Meanwhile, thought I'd share the scoring tools we're using on this project.  Made them from recycled plastic containers.  (By the way, I used Crayola air dry clay for this project and I DON'T recommend it.  Someone online suggested Amaco, which I can't wait to use and compare to the crackly-crumbly-more-expensive Crayola clay.  If you've used a good air-dry clay, please share.) 
Here is the way I made a recycled & reusable scoring tool for every student.  They worked great. Of course an opened up paper clip or other sharp edge will work fine too, but these seemed more special for the kids.


Then attach pieces using the rest of the "5 S's for attaching Clay"
 1.  Score
2.  Slip
3.  Slide
4.  Smush
5.  Smooth
(In case you're like I was a short time ago, and not up on clay terms.....1.  "scoring" is roughing up the pieces being attached.  2. "slip" is when you mix a little clay with water and make a wet-gluey-clay substance that helps hold pieces together.  3.  "slide" is sliding both pieces back and forth a wee bit until you can feel them locking together and resistance is present.  4. "smush" press pieces together a bit.  5. "smooth" together and erase seams.)
Big thanks to my son's 8th grade art teacher, Ms. Aird, for sharing those 5 S's with me!!!!!

Friday, November 5, 2010

Clay Flowers

This was a fun clay lesson I found here, thanks Bethany for sharing!  And Bethany thanked Mrs. Trott for sharing the lesson originally with her!!  We don't have a kiln, so we used air dry clay and painted with acrylic paints.  Next time I do this lesson, I'll give students a shorter skewer, and over-emphasize that each petal and leaf needs to be at least a certain thickness. 
A number of leaves and petals didn't make it to the painting stage b/c they were too thin and broke.
Materials Needed:
Clay
Paint
Wooden skewers
Small pot
Rocks to fill pot 
Make clay pieces and use wooden skewer to make the holes.  **Note, it's important to wiggle the skewer around a bit to make the holes a bit bigger than the width of skewer because the clay tends to shrink when it dries.
Paint each part separately.
After paint dries, thread pieces onto the wooden skewer.


This student got creative with broken flower.....I still think it looks great:)


Thanks tons to North County Christian School high school art students!!!


Enhanced by Zemanta

Saturday, July 3, 2010

Clay Funny Fish....Bloop, blub, blub......

Funny fish, blowfish, crazy fish.................I've been looking at various pics of these fish swimming around other blogs & finally it was my turn to share this idea with some of my students. They enjoyed the process and I especially want to thank Art Projects from MN Gal for posting her how-to on this lesson. You can see her directions here. Blub, bloop, bloop, bloop, bloop... Right-side up, Upside down Fish....

Top Hat fish, ready for the special occasion!


Thank you Summer 2010 art students!!!!