Showing posts with label NCCS 6th grade. Show all posts

Friday, April 19, 2013

Earth Day Posters

Here are some posters my students have made for Earth Day, coming up on Monday.  They loved painting their fingerprints onto the words.
  4th Grade


 6th Grade

Wish I got a closer pic of these.  Oh well.  They drew and colored God holding Earth and wrote this verse on the paper too.  
"Your faithfulness continues through all generations;
    you established the earth, and it endures." Psalm 119:90

I like the one with God riding a skateboard and holding Earth!

Thursday, January 3, 2013

Christmas Art 2012 - RoundUp!


Here are the art lessons I had fun sharing with my students during the month of December.  I teach at a Christian school and December is a very special month.

Kinder/1st Grade painted a starry night sky and pasted this poem on the bottom (ha, not really pasted, we used glue sticks.....do they even make that thick smelly white paste I used as a kid soooooo many years ago?)
A bright star lit the heavens
To light the Magi's way
To the baby in the manger
Who was born on Christmas day
Materials used:
white construction paper
blue and white tempera paint
q-tips for white stars
yellow construction paper stars


2nd Grade made poinsettia flowers and glued this poem at the bottom:
At Christmas as we celebrate the birth of Jesus Christ
Let's keep in mind the truth of Christmas Day
It's our gift of love to others, in every way
Materials used:
construction paper
we also used scrapbook paper for added interest in the green leaves
glue & glitter


3rd/4th grade made these awesome Moulding Trees and you can find more info. here.

5th grade painted angels.
They drew in pencil, outlined with black crayon, and painted with watercolors.


And Lastly 6th grade made Mini Manger Silhouettes.
We used canvas and acrylics.  Students did a practice silhouette first on paper same size as canvas.


Saturday, October 27, 2012

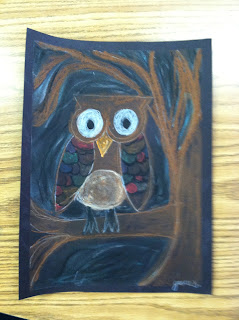
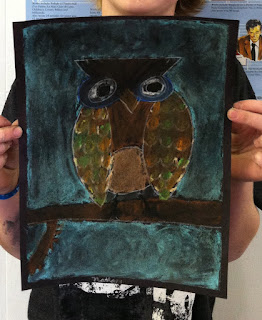
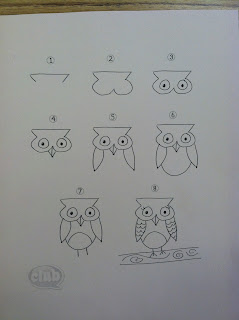
Owls for fall.....


My 6th grade class did Owl Drawings last week.  We used black construction paper and chalk pastels.  Also, I decided to tape down the sides on a back board to keep the edges of the drawing clean.  This created a nice black border.  I love the borders on artwork when the blue tape is used.  Funny though, because the kids never seem to be as impressed with the difference between "with or without" a border, as I am.  They're more focused on their art, as it should be.  Kids always teaching us what's important and what's not, eh!


Found this on Pinterest, but sad to say I can't find the link now?  But here's a link to some more inspirational OWLS.

Thanks NCCS 6th Graders!!


Friday, May 11, 2012

Mother's Day Weavings!

I saw a Christmas ornament idea using embroidery thread and cardboard circles.  I decided to use this idea for Mother's Day with my grades 5/6 students.  I used cardboard hearts though instead of circles.  (Ouch, cutting cardboard hurts, and I didn't even have to cut them all b/c I had help, but still ouch!)  These hearts look much smaller in the photos, but they're actually about 7" across and 7" tall.
This was a great texture project too.  The only hard part of the lesson was teaching some of the students how to tie their pieces of yarn together when they added a new color.  I taught the proper knot technique by giving students practice yarn first, but there were still a few kids who needed quite a bit of "knotting" help.
After the weaving, kids made their card and attached it to a piece of yarn to be used to hang the heart in a window or on a wall.


Monday, April 23, 2012

Jazzy Guitars Grades 5/6


Doing this lesson really helped the kids get the concept of rhythm and movement in art.  Diagonal lines and shapes for "movement".  Patterns and repetition for "rhythm".  I repeated that over and over again and pretty soon the kids were saying it on their own.

BIG thanks to Holly at "Lines, Dots, and Doodles" for posting this lesson and inspiring me!

The steps were:
Draw with pencil
Trace pencil with black marker
Paint everything, don't worry too much about staying in the lines b/c going to go over them a 3rd time
Paint over black lines with black paint


Monday, March 19, 2012

Mosaic Trees


Another idea found on Pinterest........ Loretta Grayson is the artist who inspired this lesson, I love her colorful art.  See lots here and more info. about her here.

The original on Pinterest were small square paintings that looked like they were done on canvas w/ acrylics, but after reading Loretta's blog - she uses a wonderful combination of pastels and paint, etc.  Because of resources, I decided instead to do the project as a paper mosaic.  It took 2 sessions, and I think they turned out great.
Steps:
1. cover 8x8" tagboard w/ mosaic paper squares
2. draw circle on 4x4" paper, cover w/ mosaic squares on opposite side, then cut out circle.
3. draw black tree branches and glue onto circle, then glue onto background.


These were done by 5th/6th graders:)

Thursday, November 3, 2011

Darn, meant to post this one before Nov. 1st.....

Boy, Nov. 1st really snuck up fast this year, I'm already looking at the calendar and seeing that there might not be enough time to do the "Clay Nativity" project I was hoping to do this year....That big Thanksgiving break gets in the way of having art fun--oh well.
Here are the scarecrows completed by 6th graders in October.
First draw the top line of pants in middle of paper.
Make upside down "V" for pants inseam. Then add pant outer legs.
Right angles, up and out on left and right for shirt.
Then add circle head. And hat.
Add suspenders, and face.
Last the squiggly lines for straw neck, hands, feet.
And paint fall leaves all over the paper.....


Awesome scarecrows, NCCS 6ths Graders.