Monday, May 30, 2011

Crusader Critters!

Awhile back someone posted a lesson their students were working on, based on "Ugly Dolls"..............Wish I noted who it was because I LOVE the idea and had never heard of these cute Ugly Dolls before.  (If it was you, let me know.  Big Thanks!)
I used the idea and my 7th grade students made their own dolls and took them out around campus and took pics to create picture books starring their dolls.  The school mascot is a Crusader, so rather than Ugly Dolls, these cuties are called "Crusader Critters".

*Update: Found my inspirer...HerDabbles, thanks bunches for giving me this idea:)


Thanks North County Christian 7th Grade Crusaders!

Friday, May 20, 2011

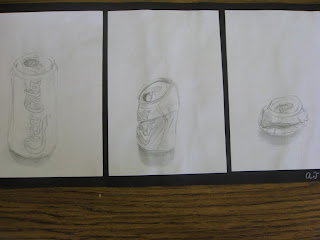
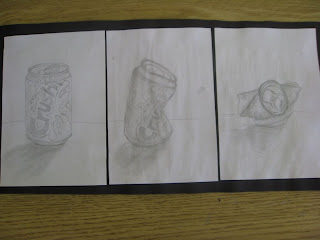
Soda Can Triptychs


Perfect, Semi-Squished, Crushed!
This lesson came from my son's wonderful art teacher named Jeanne Aird.  Each day my high school students drew a different version of their soda can to create a modern triptych.


Thanks North County Christian High School art students!
Enhanced by Zemanta

Saturday, May 7, 2011

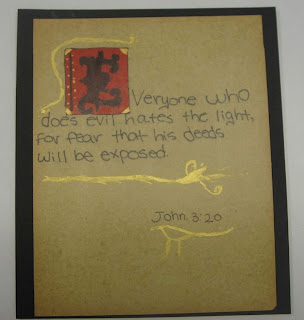
Illuminated Verses


We talked about Illuminated Lettering and I used information assembled by Amy Bruce, which I found here on TishaLou's Adventures of an Elementary Art Teacher.  You can also find great examples of fancy letters on this site too.

Most importantly though, we watched this video about Makoto Fujimura and his recent work of art titled The Four Holy Gospels.  
 
The students were truly inspired and I believe it shows in their art.  I feel so lucky to have these beautiful verses up on my art room walls!!


Each student chose their own verse.  Wrote it in pencil first, then traced pencil with black sharpie and decorated with colored sharpies.  Lastly they added gold acrylic highlights and mounted on black paper.  The paper used was donated to the school years ago and looks like parchment.  Unfortunately it had a bit of a waxy surface, vellum, so the sharpies bled around a bit, but I think they're still gorgeous:)

Thanks No. Co. Christian students!
Enhanced by Zemanta

Wednesday, May 4, 2011

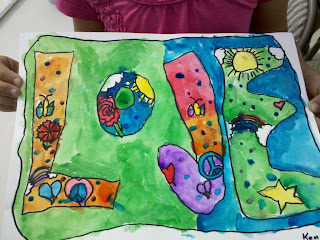
Love Sign.....


Disclaimer:  This project was done with a group that was all girls.  (You probably already figured that out.)  We used pencil, then traced in sharpie marker then added watercolor paints.

Step 1: Use the middle of the page as beginning reference point, then draw an "O" slightly above and left of middle.
Step 2:  Draw a "V" that starts at the bottom of the "O" then bring its right side all the way up, n with top of "O".
Step 3:  Draw the "L" and the "E", then outline the word so it looks like a sign.
Step 4: Brainstorm with kids different pictures and symbols that can be used to decorate letters.  We also talked about how to include decorations that don't completely "fit" inside the letters.
Step 5: Draw decorations, then paint with watercolors.


Enhanced by Zemanta

Sunday, May 1, 2011

Thanks Anne.....

National GalleryImage via Wikipedia
Anne Farrel from Use Your Coloured Pencils chose Art with Mrs. Smith as one of the blogs she really likes, well I like her blog too!
If you haven't seen this super cool "Van Gogh Chair Pop-Up" project yet, I'm sure you'll want to.  (The kids make a 3D chair!)
I'm certain it's only a matter of time before I try this lesson myself.  No doubt the kids will love it:)
Thanks Anne!
Enhanced by Zemanta