Saturday, August 3, 2013

August ALREADY????!!!!!!!


Hey Mr. Calendar, I didn't give you permission to flip the page to August already!

My brain is starting to think about school stuff everyday now.  All the exciting changes and tweaks to projects that I think will make them better.  (Is your brain doing this too?)

I've been having fun in my teaching Studio this summer.  Been really busy teaching acrylic painting on canvas for fun.  It's going to be interesting to see how I'll manage both my teaching Studio and my regular classroom at school.  (My boy is now a licensed driver so that means I have more time to devote to my crazy world of artsy happenings.)

I've been having fun w/ Bleach Pens on t-shirts lately.  Thank You - Thank You to I am Momma Hear me Roar for posting this bleach pen project years ago.  And big congrats on your new baby girl I knew I had to try it when I first saw it & it was really fun.  Now years later, I'm doing it again and selling shirts at my teaching Studio:)

If you try a bleach pen project, don't be surprised if you end up w/ big blobs of white spots all over your shirt the first time, or even the 3rd time.  

I've found that every shirt absorbs the bleach in its own unique way & there's no way of telling until you try it.  

FYI- I've found that one pen will last approx. 3 shirt designs.  When the pen starts to get empty, it's best to quit using it b/c that's when the air bubbles starting popping out of the pen and giving you big drops of bleach in places you don't want them.

Lastly, 2 more observations - When you shake the bleach pen, there will be more air bubbles in it and it's harder to get nice clean lines from it.  But, if you don't shake the bleach pen, in the beginning you will have watery fluid running out of it as you start your design.  Because of these two problems, I squeeze the watery fluid onto a paper towel first, before using the pen, and I don't shake the pen.

Here's some of the fun I've been having.


If you want to see others, you can look here too:)


Monday, May 27, 2013

Inky People/Creatures

I've posted before about Stefan G. Bucher's "Daily Monsters"  Be careful if you watch one video, you'll want to keep watching more, and more, and more.....

Materials:
straws
different sizes of construction paper (I used 6x8" & 8x10" because I wanted students to finish in one class)
Markers

Here are the FUN results from some of my high school students this year:


Here are more examples from 2011-12 students.

Saturday, May 4, 2013

Inspired by Famous Paintings

The above image is from an art magazine.....

And below are projects my high school students recently completed based on famous paintings.  Isn't it the best feeling to see young creative minds at work?!


Van Gogh "Almond Blossoms"


Vincent van Gogh "Bedroom at Arles"


George Bellows, "Dempsey and Firpo"


Michaelangelo, "Sistine Chapel"


Vincent van Gogh, "Paris Cafe"


Vermeer, "Girl with Pearl Earring"


Raphael, "School of Athens"


Salvador Dali, "Persistence of Time"


William Beard, "Dancing Bears"


Hokusai,The Great Wave


Leonardo da Vinci, Horse Study

Thanks North County Christian High School art students, 2012-13.

Friday, April 19, 2013

Earth Day Posters

Here are some posters my students have made for Earth Day, coming up on Monday.  They loved painting their fingerprints onto the words.
  4th Grade


 6th Grade

Wish I got a closer pic of these.  Oh well.  They drew and colored God holding Earth and wrote this verse on the paper too.  
"Your faithfulness continues through all generations;
    you established the earth, and it endures." Psalm 119:90

I like the one with God riding a skateboard and holding Earth!

Monday, March 25, 2013

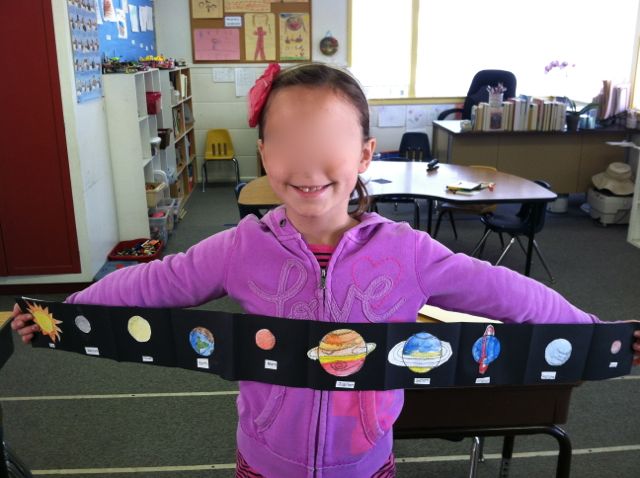
Planets Booklet

Here's a lesson I created for learning about planets.  
The kids are so cute emphatically letting me know that, "Mrs. Smith, PLUTO IS NOT A PLANET."  I tell them they don't have to include Pluto if they don't want to, but if they do, make sure to include the info. that it's a dwarf planet.


I've put this lesson as a PDF in my store at TPT.  You can check it out here.


Saturday, March 2, 2013


Love this and I didn't even find it on Pinterest!  I say this because I've found myself going to Pinterest much more than blogs when looking for art lesson inspirations.  

Have you also found yourself going to Pinterest more than blogs?  (Hmmmm, this is a silly question because if it's "Yes", you're probably not seeing it because you're on Pinterest right now.)

In a way I feel like Pinterest has stolen me away from the beautiful bloggers whom I admire.  

Recently I decided to try to get back in the habit of visiting blogs instead of going for the quick searches on Pinterest.  I'd be bummed if blogging went away because others started doing what I've been doing.

So to all of you bloggers out there....please keep on 
blogging; I promise I'll keep visiting.

Thursday, February 28, 2013

What do You do?

No pics or lesson steps, just a request for your ideas................
You know those kids in your class that like to ask, "Mrs. Smith, is this okay?"  "Mrs. Smith, is this good?"  "Does this look good?"

On the days that my patience is less than usual, that is the question that sends tingles up my spine.

How do You answer that question? 

Okay, I fibbed.  I can't do a post without a pic.  We did Oreo sculpting a while back, and I thought this one turned out sweet. (Ha, no pun intended.)

Wednesday, February 27, 2013

HEARTS


Well, it's still February so I'm going to post one of the Valentine's Day lessons I did my K/1 class.......I might also use this lesson in for Mother's Day with one of my other classes.  When Mother's Day comes around I like to look through the Valentine's lessons because I think us mommy's can never get too many cards with hearts on them:)

It's a non-original idea, but I'd never tried this version before.
1.  Put heart stickers on paper.
2. Paint over heart stickers.
3. Let dry (by the time we had the desks and tables cleaned up from the painting, they were dry enough), and peel off the stickers.

I had a helper the day before the lesson, so I also decided to blue tape the borders of the white paper to a board to give the finished painting that beautiful white frame around it.

So super simple!  I did have a couple students who needed extra help on the concept.  They were painting pictures around the hearts, even though I explained and demonstrated the whole process.  They needed extra encouragement and communication to paint directly over the stickers.

Saturday, February 16, 2013

SeaLife Art

My high school students finished their "zentangle" version of my Sea Life MEGA Poster and I love the way it turned out.  
They do to:)

Our school colors are Red and Black, so that's why they outlined the subjects with red and did the zentangling with black.  Next time I tell them to outline their subjects with a thick red line.  The thick red lines around the subjects look better than the ones with a thin red outline.
Funny how some students don't like making zentangles?  I consider it such a huuuuuuge luxury to sit down and have the time to make a zentangle and they consider it a chore.  Oh well, that's what makes our planet more interesting - we have our differences:)

Here's a link to the MEGA Poster PDF at my Teacher's Pay Teachers store.  Of course it can be colored traditionally too, and even 1st graders can do this project.