Monday, March 25, 2013

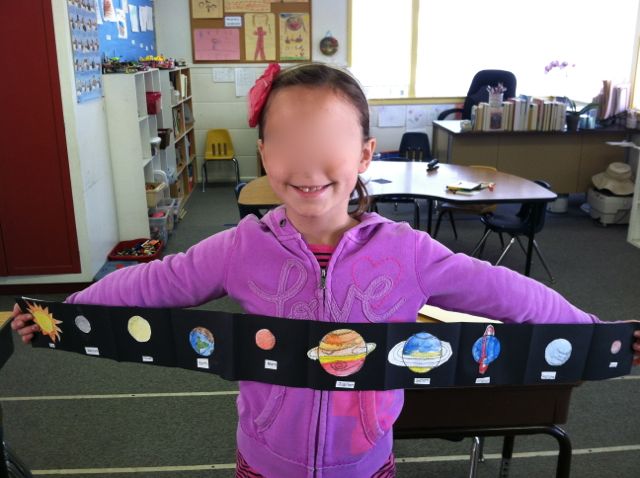
Planets Booklet

Here's a lesson I created for learning about planets.  
The kids are so cute emphatically letting me know that, "Mrs. Smith, PLUTO IS NOT A PLANET."  I tell them they don't have to include Pluto if they don't want to, but if they do, make sure to include the info. that it's a dwarf planet.


I've put this lesson as a PDF in my store at TPT.  You can check it out here.


Saturday, March 2, 2013


Love this and I didn't even find it on Pinterest!  I say this because I've found myself going to Pinterest much more than blogs when looking for art lesson inspirations.  

Have you also found yourself going to Pinterest more than blogs?  (Hmmmm, this is a silly question because if it's "Yes", you're probably not seeing it because you're on Pinterest right now.)

In a way I feel like Pinterest has stolen me away from the beautiful bloggers whom I admire.  

Recently I decided to try to get back in the habit of visiting blogs instead of going for the quick searches on Pinterest.  I'd be bummed if blogging went away because others started doing what I've been doing.

So to all of you bloggers out there....please keep on 
blogging; I promise I'll keep visiting.

Thursday, February 28, 2013

What do You do?

No pics or lesson steps, just a request for your ideas................
You know those kids in your class that like to ask, "Mrs. Smith, is this okay?"  "Mrs. Smith, is this good?"  "Does this look good?"

On the days that my patience is less than usual, that is the question that sends tingles up my spine.

How do You answer that question? 

Okay, I fibbed.  I can't do a post without a pic.  We did Oreo sculpting a while back, and I thought this one turned out sweet. (Ha, no pun intended.)

Wednesday, February 27, 2013

HEARTS


Well, it's still February so I'm going to post one of the Valentine's Day lessons I did my K/1 class.......I might also use this lesson in for Mother's Day with one of my other classes.  When Mother's Day comes around I like to look through the Valentine's lessons because I think us mommy's can never get too many cards with hearts on them:)

It's a non-original idea, but I'd never tried this version before.
1.  Put heart stickers on paper.
2. Paint over heart stickers.
3. Let dry (by the time we had the desks and tables cleaned up from the painting, they were dry enough), and peel off the stickers.

I had a helper the day before the lesson, so I also decided to blue tape the borders of the white paper to a board to give the finished painting that beautiful white frame around it.

So super simple!  I did have a couple students who needed extra help on the concept.  They were painting pictures around the hearts, even though I explained and demonstrated the whole process.  They needed extra encouragement and communication to paint directly over the stickers.

Saturday, February 16, 2013

SeaLife Art

My high school students finished their "zentangle" version of my Sea Life MEGA Poster and I love the way it turned out.  
They do to:)

Our school colors are Red and Black, so that's why they outlined the subjects with red and did the zentangling with black.  Next time I tell them to outline their subjects with a thick red line.  The thick red lines around the subjects look better than the ones with a thin red outline.
Funny how some students don't like making zentangles?  I consider it such a huuuuuuge luxury to sit down and have the time to make a zentangle and they consider it a chore.  Oh well, that's what makes our planet more interesting - we have our differences:)

Here's a link to the MEGA Poster PDF at my Teacher's Pay Teachers store.  Of course it can be colored traditionally too, and even 1st graders can do this project.

Sunday, January 13, 2013

Clay Time....

We're beginning clay projects.  After experimenting with some other brands of air dry clay last year, I'm back to using Crayola Air Dry clay.  It's not so great, but I haven't found any other brand that's reasonably priced and better.

3rd graders are making these cute BUNNIES.  They're hollow in the middle so they can kind of be used as finger puppets too.


2nd graders are making CUPCAKE Boxes.  Next time I need to remember to give kids a ball of clay closer to the size of a golf ball than the size of an apricot for making the bottom of their cupcake.  The walls of clay were thicker than I prefer, hopefully they'll dry okay.


Lots of messy fun ----- a few kids were absent ----  that's one of my biggest challenges in being an art teacher.  So time consuming helping kids get caught up who've been absent.  In the past I worked at a large school, so it was virtually impossible to offer all the time necessary for all the absent kids.  Now I offer make-up arrangements for absent kids.

How do you deal with absent students from your art classes?  Would love to get your ideas.

Thursday, January 3, 2013

Christmas Art 2012 - RoundUp!


Here are the art lessons I had fun sharing with my students during the month of December.  I teach at a Christian school and December is a very special month.

Kinder/1st Grade painted a starry night sky and pasted this poem on the bottom (ha, not really pasted, we used glue sticks.....do they even make that thick smelly white paste I used as a kid soooooo many years ago?)
A bright star lit the heavens
To light the Magi's way
To the baby in the manger
Who was born on Christmas day
Materials used:
white construction paper
blue and white tempera paint
q-tips for white stars
yellow construction paper stars


2nd Grade made poinsettia flowers and glued this poem at the bottom:
At Christmas as we celebrate the birth of Jesus Christ
Let's keep in mind the truth of Christmas Day
It's our gift of love to others, in every way
Materials used:
construction paper
we also used scrapbook paper for added interest in the green leaves
glue & glitter


3rd/4th grade made these awesome Moulding Trees and you can find more info. here.

5th grade painted angels.
They drew in pencil, outlined with black crayon, and painted with watercolors.


And Lastly 6th grade made Mini Manger Silhouettes.
We used canvas and acrylics.  Students did a practice silhouette first on paper same size as canvas.


Tuesday, January 1, 2013

Moulding Christmas Trees

This year our wonderful 4th grade teacher at my school found a "Moulding Christmas Tree" in Sunset magazine and asked if I'd help her students each make one.  She and her husband did all the legwork, so it was piece of cake for me.  All I had to do was help students paint the branches.
These are the measurements we used:
Branches are 5 pieces of moulding @ 8", 7", 6", 5", and 4"
Then the top is a small piece of moulding (as shown), or it can be a small triangle of wood.
The trunk is a 1"x1" piece of wood, 18" tall.
The base is 16" across.
Branches were glued on with hot glue and base was attached with screws.
The kids were so proud of their creations!!


Monday, December 3, 2012

"Christmas Eve" Collages


"Christmas Eve" by Henri Matisse was our inspiration 
for these collages.  
They were done by 3rd graders:)


Here is the original, by Matisse.


Saturday, November 24, 2012

HOOT-HOOT


Are owls more popular now than they were in the 70's?  I remember making LOTS of macrame owls back then, hmmmmmm what did all those people do with those macrame owls I made for them Christmas?

My Kinder/1st graders made these owls.  Lots of cutting and tracing prep, but it was worth it.  Even with all the pre-made parts, it still took two full periods.
Here are the materials that the students received for the project:
 1st Day - Each child received white construction paper w/ owl parts already traced on it.
2nd Day - Each child received black background paper, grey paper w/ tree branches already traced, 2 yellow eyes, 2 black eyes, 2 feet, 1 beak, 1 moon traced.

Here's the order we used:
1st Day
1.  Traced outlines on owl parts and added feathers and face features with crayon.
2.  Painted all owl parts with watercolors.

2nd Day
3.  Cut & glue tree parts onto background.
4.  Cut & glue owl parts onto background.
5.  Glue face parts onto owl.
6. Cut & glue moon onto background.


Wednesday, November 14, 2012

Folk Art Style

Big thanks to Holly V. at Lines Dots & Doodles for posting this fun Folk Art lesson.  I had never seen Karla Gerard's artwork before, and it's wonderful inspiration!

These were done by 5th graders and we took 2 class periods to do these paintings.  First we studied the patterns and variety in Karla Gerard's examples that I put on the board.
Then student's drew a rough draft version of their landscape on scratch paper.  Then a real version on construction paper.  Next every line was traced with oil pastels.
Next meeting, the kids painted their pictures with watercolors.