Saturday, October 27, 2012

Owls for fall.....


My 6th grade class did Owl Drawings last week.  We used black construction paper and chalk pastels.  Also, I decided to tape down the sides on a back board to keep the edges of the drawing clean.  This created a nice black border.  I love the borders on artwork when the blue tape is used.  Funny though, because the kids never seem to be as impressed with the difference between "with or without" a border, as I am.  They're more focused on their art, as it should be.  Kids always teaching us what's important and what's not, eh!


Found this on Pinterest, but sad to say I can't find the link now?  But here's a link to some more inspirational OWLS.

Thanks NCCS 6th Graders!!


Friday, October 19, 2012

Colors & Shapes

Whew!!! Finally posting.......too many plates spinning these days, can you relate????

My 2nd graders did this lesson last week.  I thought it was successful and I love the clean simple aspect of the colors on black.

First I gave students this white paper which had these shapes already drawn on it.  (note * If I had the kids more than 40 min. twice/month, I'd have them draw their own shapes.)

Then the students cut and glued their white shapes on black background.

Next, the students chose various pieces of colored construction paper and cut out smaller and smaller circles and oval shapes. 


And here is the gorgeous quilt that I saw on Pinterest that inspired this lesson.


This amazing quilt was created by Carol, her artistry is admirable & you'll find her blog HARD TO LEAVE!


Sunday, September 23, 2012

Pinwheels for PEACE

Yea, this year my school participated in Pinwheels for Peace!!!
It was so worth the time and effort.


Next year I'll need to figure out a better way to attach our large, laminated pinwheels to the sticks.  Everyone of them came apart b/c the pin couldn't hold them together......  I've seen some schools use pipe cleaners and beads, maybe I'll try that method?
Check out the Pinwheels for Peace website gallery.  It's very inspiring!

What a great event - Big thanks to the 2 art teachers in Florida who 
started the project approx. 7 years ago.

P.S. Side Note - See the beautiful building in the 2nd photo?  That's our City Hall that was ruined in the earthquake we had in 2003.  It's finally being rebuilt, you can see scaffolding.  The quake happened on Dec. 21st and we're so thankful the kids were not in school.  One middle school was condemned after the quake.  Now it's been rebuilt and it's literally the safest building in the whole county 
to be, if (when) there's another earthquake.

Sunday, August 5, 2012

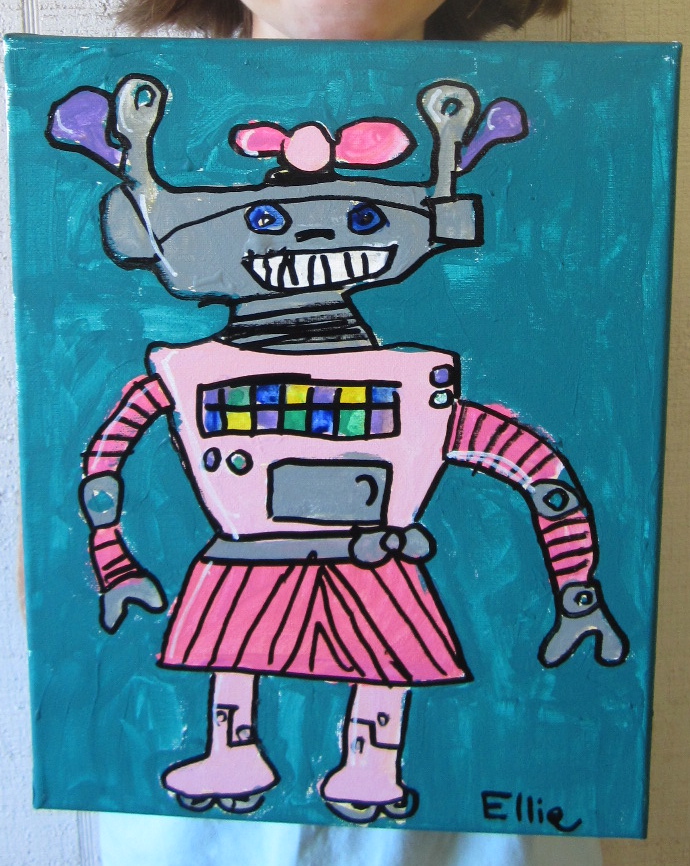
Robots


I used the How to Draw a Robot pages from Blue Tadpole Studio to give the students inspiration for their robot paintings.  I never get tired of seeing the color combinations that kids choose for their art.  Seems like the younger the artist, the more I find myself pleased:)
The steps we used were:
1. Draw robot on scratch paper
2. Draw robot on canvas.
3. Paint Robot.
4. Paint background.
5. Outline Robot parts with black paint pen.
6.  Add white highlight marks with white paint pen.


Wednesday, July 25, 2012

Summer Sea Turtle Art


My summer students made these sea turtles recently.
I gave the kids rock that I'd already painted with white acrylic paint.  Then they drew their turtles on the rocks with a pencil.  Then dotted around the turtle with acrylic paint, using a Q-tip to create aboriginal style paintings on rocks.

Saturday, July 7, 2012

Penguin Pots

Have you seen the cute little clay penguins 
floating around Pinterest?

I made them with some of my summer students, and they turned out adorable:)
We just made 2 pinch pots, then added wings and feet to one of them, and beak and eyes to the other.  We used Crayola air dry clay, and acrylic paints.

These cuties were made by 4th & 5th graders.  The one on the left was named "Lulu" & one on the right was named "Bob."


Great job, Ellie & Lauren!!!!

Monday, June 18, 2012

Drippy Art


I've been wanting to do some type of "Pour Painting" ever seeing this video a while back.  I've been hesitant because I wasn't sure about using so much paint for a project that might not turn out well, and also wondering how to manage a class of students doing the "pour" art all at the same time.
So when last day of school came around, I had a number of old canvases that had been donated and a number of small bottles of acrylics paints and decided to let the kids go for it.
I loved watching them experiment with the colors and dripping the paint down the canvases, but if I ever do the project again, I'll do it on a different day rather than the last day of school.  Last day of school is too crazy already, and to add a crazy art lesson was too much for me.
I can share though that the project used less paint than I thought it would.  Just a little paint dripped a long ways.
I originally had a few different ideas for dripping the paint.  Using spoons, using syringes (that was messy joke!), but eventually I realized for the purpose of having 12 kids doing the project at the same time meant that they just had to pour the paints right out of the 2 oz. bottles.  Next time I'll plan farther in advance and get more cans of paint donated and we'll use spoons.


Thursday, June 14, 2012

Father's Day "Heart Books"

These Heart Books were made by 1st graders.  (Note, I folded paper and drew half a heart on the fold for each child before the lesson because many of the 1st graders would have had a hard time drawing the half heart big enough for a book.  I also drew the half circles on the fold ahead of time.)
Step 1:  Kids cut both papers at the same time on the fold.  They also cut 3 half-circles on the fold too to create the holes for the yarn binding.
Step 2:  Thread yarn through the 3 holes and tie a know at the bottom.
Step 3:  Write and illustrate the book, "Why I Love You"


Tuesday, June 5, 2012

Being Foodies in the Art Room

Have you seen this book?  It's very entertaining.

My high school art students made their own versions of food "beings".  It was fun:)