Monday, April 23, 2012

Jazzy Guitars Grades 5/6


Doing this lesson really helped the kids get the concept of rhythm and movement in art.  Diagonal lines and shapes for "movement".  Patterns and repetition for "rhythm".  I repeated that over and over again and pretty soon the kids were saying it on their own.

BIG thanks to Holly at "Lines, Dots, and Doodles" for posting this lesson and inspiring me!

The steps were:
Draw with pencil
Trace pencil with black marker
Paint everything, don't worry too much about staying in the lines b/c going to go over them a 3rd time
Paint over black lines with black paint


Monday, April 16, 2012

Inky Monsters


You know those art lessons that you really want to do, but continually move it to the back burner because you're really nervous about trying it?  (Or maybe it's just me?)
The first time I saw Stefan Bucher's "Daily Monsters" I flipped.  So wonderfully simple yet fantastic.  I so wanted to share the idea with my students but my fears were:
1.  Ink.  My classroom is not an "art room".  I don't even have a sink in my room.  (So far, I'm the only art teacher I know without a sink.)  Hence, using INK for a project seemed daunting at best.
2.  Blown Ink Monsters.  Sometimes when I give my students lots of freedom/little instruction many of them freeze and look at me like I just told them perform brain surgery.  I then spend a significant portion of the period coaxing these students to really stretch and come up with something creative w/o me spoon feeding it to them.  I realize this is my job, but when my lessons are more structured and the expectations are more defined, my job becomes easier.

Well, I bit the bullet before spring break & assigned the students the task of creating their own "Ink Monsters".  I showed them some of the Daily Monsters created by Mr. Bucher first.  Then my fears quickly disappeared and I had a blast watching and listening to my students create fun and fanciful monsters.

Step 1 - drop some ink on paper, we used white construction paper size 5x7"
Step 2 - blow ink around with a straw, we tried skinny stir straws too and they didn't work as well as regular straws. I also cut the straws in half, thinking the kids wouldn't have to blow as hard.  I'm not a scientist though, so  I have no idea if this was true.
Step 3 - Embellish the ink blot w/ a black marker and create a monster.

These are some of the Monsters they created:


Sunday, April 1, 2012

Easter Art Time

Easter Break started for us on Friday!

Our artwork celebrating the holiday.  My favorites are the Easter Lily flowers drawn by the 2nd/3rd graders & even though everyone else thinks they're beautiful....I had multiple kids extremely frustrated with their "flower drawings".  They word "ugly" was stinging my ears often during this lesson.  

Sigh. 

When I shared with a friend that my high school students were so displeased with the "prints" they made & the fact that they couldn't get past the idea that "prints" are not supposed to look like drawings, etc.  He said to me that they haven't developed yet a sensibility that it takes to see art in that way.  Makes sense.


Ahhhhh what a beautiful feeling when the art lesson is truly one that stretches the students and takes them out of their comfort zone and they are pleased with their results.  These are the days I feel like I've won the jackpot.   (This didn't happen w/ the lilies below, but I'm not giving up.  Can't wait to try again next year:)  Hope you enjoy them.
1st Grade "Crosses on a Hill"


2nd/3rd Grade "Easter Lilies & Cross"


5th/6th Grade "Mosaic Crosses"


Monday, March 19, 2012

Mosaic Trees


Another idea found on Pinterest........ Loretta Grayson is the artist who inspired this lesson, I love her colorful art.  See lots here and more info. about her here.

The original on Pinterest were small square paintings that looked like they were done on canvas w/ acrylics, but after reading Loretta's blog - she uses a wonderful combination of pastels and paint, etc.  Because of resources, I decided instead to do the project as a paper mosaic.  It took 2 sessions, and I think they turned out great.
Steps:
1. cover 8x8" tagboard w/ mosaic paper squares
2. draw circle on 4x4" paper, cover w/ mosaic squares on opposite side, then cut out circle.
3. draw black tree branches and glue onto circle, then glue onto background.


These were done by 5th/6th graders:)

Saturday, March 17, 2012

Cleaning up........

It's almost end of March, and still, I'm reminding students proper clean-up techniques.  Who am I kidding, they're kids, of course they still needs reminders.


P.S. Do you use these palettes too?  I'm not a fan b/c they're hard to clean, but I also hate using disposable stuff like small condiment cups, wax paper palettes, etc.  Tried pill boxes once, but I bought the circular kind which were impossible to clean.  Saw them at the $1 store so I couldn't resist, I bought 8 of them:(

What's your FAVORITE paint palette for 20+ kids?

Sunday, March 11, 2012

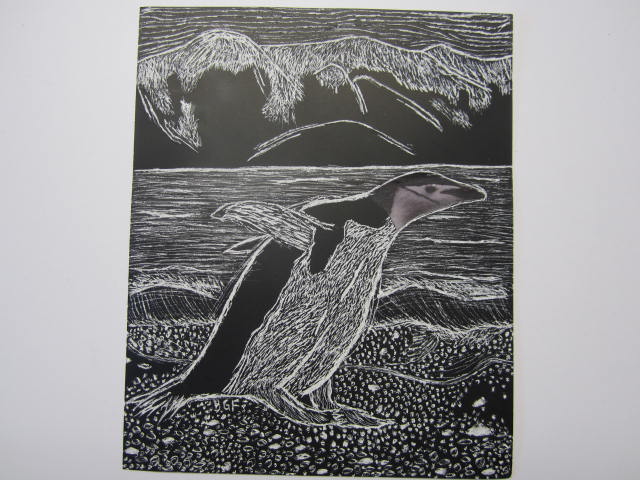
ScratchArt


Have been wanting to do a scratch-art lesson for ages, and finally tried it.  My high school students enjoyed it a lot.  I got the idea of starting with a face from Nena at  The Painted Apple.  Her students create marvelous work and I'm so glad she shares it in her blog!

I gave the students magazines and calendars and told them that their subject had to be an animal or a person.  I also showed them my example which was a frog.  Not surprisingly, all of them chose animals.  Then I made a color photocopy of the animal.  They cut
Here are the steps we took:
1.  Draw the whole animal in pencil on scratch paper.  This is the practice drawing.
2. I made color copies of each animal and students cut out ONLY the face of the animal and glued it onto their scratchboard.  (By the way, I was surprised to find that my small local art supply shop sold 24"x36" sheets of scratchboard for $3.00 ea.  I really didn't want to take the time to have the students make their own.)  (Also, by the way, you don't have to make color copies of animals.  I did so because I didn't want the originals ruined by having face cut out.)
3.  Students used edge of paperclip, or toothpick, or side of scissors to scratch the animal and background.  They chose their preferred tool.


Sunday, February 26, 2012

Kinder Socks

(Good gracious!  I found these socks pics and wrote this post.....AND just realized that I already posted this lesson not long ago.  Geeesh, oh well it really was a FUN lesson, so here it is again.)

Big Thanks to Laugh Paint Create and Mrs. Knight's Smartest Artists  for sharing their lessons inspired by the book, A Pair of Socks by Stuart J. Murphy & Illustrated by one of my favorites, Lois Ehlert.
My kinders loved the book and loved making their own "Matching Socks".  They also surprised me with how well they were able to make two identical socks with the same designs.