Friday, September 16, 2011

Frida Kahlo

This year I decided to do something different on the first day of art class with my high school students.  Since the kids' schedules changed a lot the first week of school, I saved the important info. until I knew my class was set.  So instead of rules and information I did a directed drawing lesson using pastels.  
I consider directed drawing lessons as swimming in the "shallow end" of the pool and figure I need to gain their trust before I send them to  the "deep end" later.
(Note- When we do directed drawing lessons, I tell students they're free to make their own changes if they're inspired to do so.)

 Right now I've been blessed with an adorable 8th Grade teacher's assistant.  She's in my room 3 times/week helping me prep for lessons and putting up artwork, and she's a wonderful artist!  She made the sign above:)


Tuesday, September 13, 2011

Colors & more Colors

Students creating their own colors 

My high school students made their own color wheels using only Blue, Yellow, Red, Black, White.
I was very glad another teacher gave me the direction to follow this order of ingredients when creating tints, shades, and tones:
Tint:  Add color to white  (adding white to the color wastes more paint)
Shade:  Add black to color  (adding black to the color wastes more paint)
Tone: Add grey to color


 Then they made an attempt to match colors on a paint chip strip.  Still, only using primary colors and black & white.  I told them they could keep painting over their colors as many times as they wanted before the bell rang.  Most kept making corrections until time was up.  It was fun to watch.


Saturday, September 10, 2011

1st Grade Lines, Shape, Primary Colors

.Good Golly, I haven't posted since July 15th....hope I remember how to do this.

New year and new schedule for me.  For the past seven years I've been bouncing around as an Artist-In-Residence (or Art Docent, different schools used different titles) at many different schools and grades throughout the school year.  No two years in a row have been the same.  My contracts would often overlap one another, but I made sure to rarely book myself at two schools on the same day.  One year I had 6 contracts overlapping for a 2.5 month stretch.  That meant juggling the grades and schedules of 6 different schools, going to a different one everyday.  It was too much, the art lessons were great, but everything else wasn't.  I was putting the milk in the cupboard, losing my keys, wearing one black & one brown sock, etc. 
This year I'm at one school with a classroom that I share with a Math teacher and Journalism teacher who both graciously let me takeover the walls and room w/ my art stuff.  I teach 2 high school beginning art classes, and 7 elementary classes.  It's very part-time, technically only 2.5 hours/day, but you know how that goes.  It's 2.5 hours with kids and a whole lotta time with materials, the computer, the copy machine, the bulletin boards, the other teachers for discussing students, and of course my best friend the paper cutter.
Two weeks into my new schedule and all is well:)

Here is the line, shape, and primary colors lesson for 1st graders.  Kids practiced on scratch paper first making One Line, with One Shape in it, 3 times on their paper.  Some found this quite difficult.  Encouragement to use most the paper was necessary too, otherwise there were 3 tiny lines and shapes on big piece of paper.
The assignment was to make 3 lines with a shape, then color with primary colors.  Students could darken their black lines if they wished.


Thanks NCCS 1st graders!

Friday, July 15, 2011

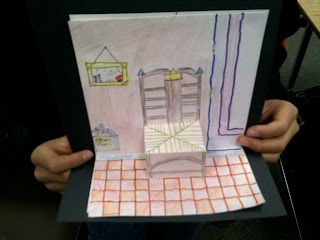
Van Gogh Chair - 3D


Here's Van Gogh's Chair to go with Van Gogh's Sunflower 3D lesson.  Again, thanks Anne from Use Your Coloured Pencils for inspiring this idea with her Van Gogh Pop-Up Chair lesson.

Each student was given one black paper and 2 white papers.
First step we did was place 2 whites evenly in center of black paper, then folded up the bottom of the papers all at the same time.  (I think the paper was 5x7" and we folded up 3"?)
After that, cut two slits in one white paper on the fold to make pop-up chair seat.
Then we drew and colored chair and background on first white paper, then drew and colored floor and wall on white paper with slits cut for chair.
Then we drew floor and wall on 2nd white paper in area that shows through the back, when white papers are placed on top of one another.
Last, glue white papers onto black background.
 Example of front white paper and background white paper.  Below is what they look like when placed on top of one another.


The little chairs looked so cute on the book shelves in the classroom:)  Thanks bunches Flamson 6th graders!

Tuesday, July 12, 2011

Just Curious?

Last year, summer lesson art project.

How many of us teach art lessons/camp 
during the summer?

I've taught art lessons in my garage during the past 3 summers, but this summer I was on call for "jury duty" in June, so I couldn't schedule any lessons.  I must admit I've enjoyed the time off, but not teaching goes with less income..........oh well........

Just curious if you teach art during the school year, AND summer too?  If you do, my hat goes off to you!!

I love kids, but honestly there are times when I revel in not being around other people's children.
Enhanced by Zemanta

Tuesday, July 5, 2011

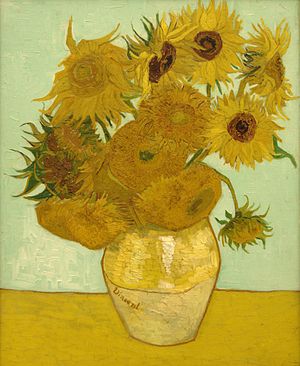
Van Gogh Sunflowers- 3D

Vincent van Gogh, Vase with 12 sunflowers, 188...Image via Wikipedia
Thanks Anne from Use Your Coloured Pencils for inspiring this idea with her Van Gogh Pop-Up Chair lesson.  We did the chairs too, they were fun!

This was a simple lesson, but it took longer than I thought it would because the kids got into the coloring of their backgrounds.
Each student was given 1 black, 6"x9" paper, and 1 white 5"x7" & 1 white 4"x6" papers.
First they placed 5x7" white in center of black, and folded up the bottom 1/3 of the papers together.  (Then put black paper aside til later.)
Next make 2 cuts on fold of 5x7" white paper to make the 3D shelf which will hold the vase of flowers in front of the background.
On smaller sheet of white paper, students draw vase and flowers, then cut and glue onto shelf.  (Tell kids to use up whole piece of paper for their vase and flowers, otherwise it'll be too small.)
Last, glue white background onto black background.


Enhanced by Zemanta

Wednesday, June 22, 2011

4th of July Flag!

Everybody now! "I'm a Yankee Doodle Dandeeeee, a Yaaaaankee Dooodle Do or Die. A real live nephew of my Unnncle Sam, born on the 4th of July...."
Here's a fun printmaking craft for the holiday.
Thanks bunches to Teach Kids Art for sharing this idea for monoprints!
Thanks bunches to my real live neighbor, really named "Sam" who created this awesome "Flag" monoprint below:) Tempera paint on foil. The paint doesn' t have to be too thick.
Draw "backwards" flag with a Q-tip.
After drawing is complete, cover gently with paper. (We used cardstock)
Roll a brayer lightly over the paper, careful not to move the paper around.
Lift paper carefully from both sides at a time.

And KABOOM! Light the fireworks and celebrate 'cause this is one awesome flag!!!