Saturday, January 29, 2011

Insect Silhouettes

We made Imaginary Insect Silhouettes, and I have to thank Holly at Decor8 for posting the image (the black bugs on white background artwork that's halfway down the page) that gave me the lesson inspiration.

We also decided to give each bug a crazy name by randomly choosing 3 words from the dictionary then making up a new word using parts of each word.  Ex. refrigerator, soil, perspiration = "Persoilerator"
After giving the insects names, we also wrote where they could be found, both geographical location and physical habitat, and what it eats.  Ex. "Persoilerator.  Found in Asia, lives in fresh water, eats salamander eggs."

The steps for making the bugs is easy and we reviewed art words: positive and negative space, and symmetry.
Steps:
1.  Fold black paper, draw half the bug on the fold with chalk or white crayon.
2. Open the paper and visualize the whole bug.  Make corrections if you want to, ex. bigger head, legs, etc.
3.  Cut and glue onto white background.
4.  If I do it again, I would have students write bug name and description on separate piece of paper because I thought their writing took away from the design of the insects.


Well - this pic isn't upside down, until I post it?  Re-tried, and it's still upside down....you can still get the gist that this student made a bug family:)


And this one wants to stay sideways in the post, oh well!
Thanks Flamson Middle School 7th and 8th grade GATE students!

Friday, January 21, 2011

Staff Mural Project

This idea for a staff project came from Holly and Ted who shared their staff "snowmen" projects. Or, should I say "snowperson" projects because the one I liked best was a snow-woman wearing a hula skirt and coconut bikini top!  If you didn't see the projects, here are Holly's, and here are Ted's.  Super fun stuff!


I ordered this amazing butterfly mural from Kathy and staff members decorated their parts.  It was very fun for everyone to guess who did which parts. And it was one of the highlights of our "Fine Arts Night" last night.

Tuesday, January 11, 2011

Modigliani Style Portraits

Modigliani amadeo12345Image via Wikipedia
My students really enjoyed this Modigliani style, portrait lesson.  Thanks bunches to Kathy at Art Projects for Kids for sharing her easy to follow "How-To" for this lesson.  The students especially liked making their clothing look like the shirt they were wearing the day of lesson.  (These portraits were done with oil pastels on black paper.  They were made by 6th graders and High Schoolers....thanks to Flamson Middle School and No. Co. Christian students.)


Enhanced by Zemanta

Friday, January 7, 2011

Organic and Geometric SHAPES

Students are learning the difference between Organic and Geometric SHAPES.  We did some quick small paintings to illustrate the different shapes.  We used pencils, black sharpies, and watercolors.

ORGANIC SHAPES


GEOMETRIC SHAPES


Thanks to North County Christian students!
Enhanced by Zemanta

Wednesday, December 29, 2010

"ME" clay boxes

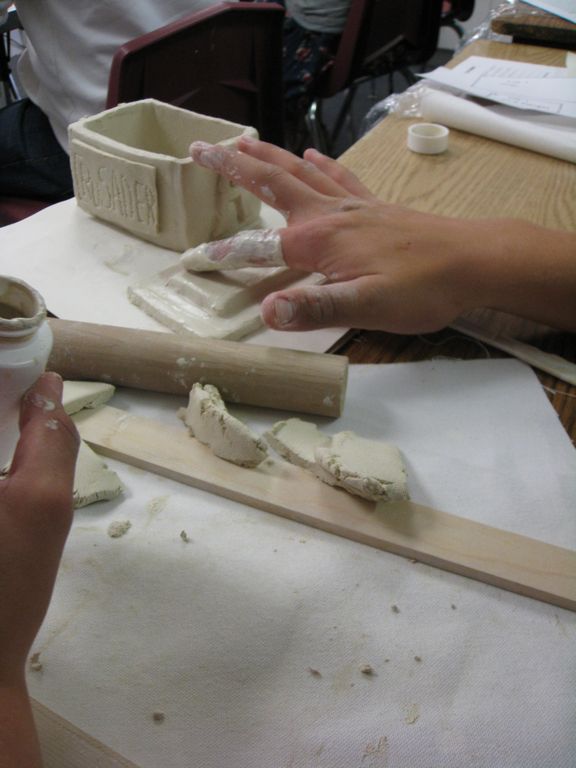
My son's awesome middle school art teacher, Ms. Aird, shared this clay box lesson with me and my students finished their boxes before Christmas.  As I mentioned in an earlier post, we used Crayola Air Dry clay which is not a clay I'd recommend.  It hardens quickly and cracks and crumbles easily - but with all that being said - I think my students did a great job creating fun boxes!!!

Project Goal:  Create a box that has symbols on all 4 sides and on the lid representing your personality.

Step 1:  The students completed a worksheet answering basic questions to give them ideas for the symbols they'd put on the sides of their boxes.  (Questions such as, What do you like to do in your free time? Who are the important people in your life?  Favorite foods? Favorite time of year?, etc.)  And on the bottom of the worksheet, they had to sketch ideas for each side of their box in 3 given rectangles and 2 given squares.  You can see the worksheet in the picture above.

Step 2:  Each student was given a pattern of a rectangle and a square.  Using the pattern, they had to create 4 rectangles, for the bottom - long sides- and lid, and 2 squares for the short sides of the box. We used rails and wooden dowels for creating even slabs for cutting the shapes. (One class also made another small rectangle to attach to the base of the lid so it wouldn't move around and fall off the top of the box.  The other class didn't do this step b/c we ran out of clay and their lids stayed on fine.)

Step 3: Roll skinny snakes of clay to cover up and strengthen all the inside seams of the box.  Four skinny snakes pressed and smoothed into the bottom seams, and 4 more pressed into the side seams.  Use plenty of "slip" to make the seams strong and smooth.  I like to give students small medicine bottles full w/ slip, they're airtight and easy to store for future use.  You can see boy holding one in the picture above.

Step 4: Attach symbols on all four sides of box, they can be 3D or carved in.  Attach 3D symbol on lid to act as handle.  Then paint after dry.  Some of the students didn't slip and score their attached symbols well enough and they fell off, but we glued them back on.  I also sprayed the finished boxes with clear gloss sealer.


Big thanks to North County Christian High School art students!!!