
Saturday, October 30, 2010
Drying Rack?
Monday, October 18, 2010
Artist Quote
 Image via Wikipedia
Wednesday, October 13, 2010
Huichol Yarn Painting
 Image via Wikipedia
 Here's a "cultural art" lesson my students recently completed.....it's called "Yarn Painting".
This lesson idea came from a textbook called ARTTALK by Rosalind Ragans. The Huichol people live in Central Mexico and are known for their bright colorful yarn art. When creating their yarn paintings they cover a board with hot melted wax, then adhere the yarn before it dries. Sometimes they also use tree sap instead of wax for adhering the yarn. Needless to say we didn't have the time to gather tree sap, and I believe I would've had a student mutiny on my hands if I told my students we'd be doing the project the authentic way. So instead we used glue.
Also, instead of paying tribute to various gods of nature as the Huichol do, we used Christian symbols in our art.
Ours are done on boards that I had from a leftover project years ago, but cardboard would also work fine. Remind the students often that the goal is to cover the entire background with yarn. Also suggest to your students that they use a paperclip for sometimes tapping the yarn down into the glue, rather than their fingers all the time.
These were done by high school students, but younger students could do this project too. I would make their boards approx. 4x6" - ours were bigger.
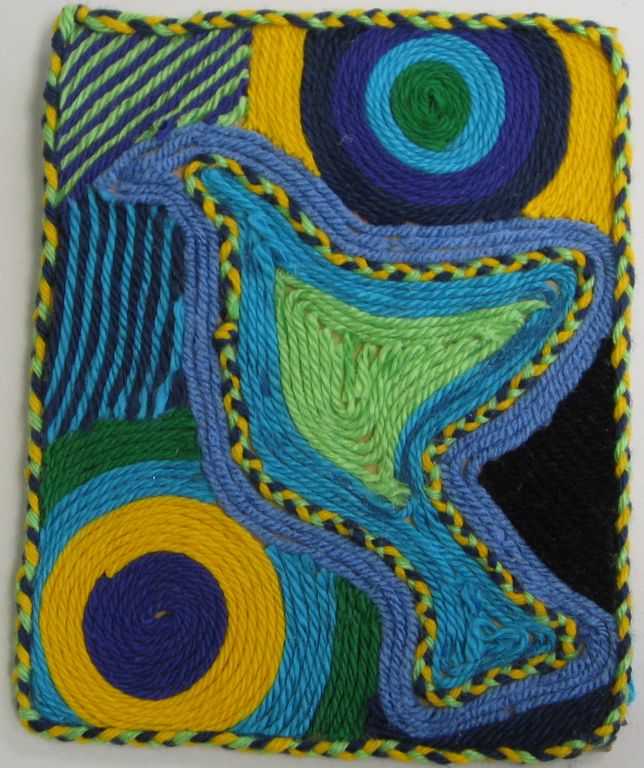


 BIG Thanks to North County Christian High School students for their awesome effort!
Monday, September 27, 2010
Op Art, Spheres & Cones
 Image via Wikipedia
 This was the 3rd project in our series of Op Art lessons.....Students took their knowledge of creating "spheres" and added "cones" in the background. Big thanks to Jodi at One Crayola Short for sharing this super lesson. It's a great primer for getting students to really wrap their head around how adding "values" can truly make a big difference in their art! (My students are high school, but Jodi did this lesson w/ 5th graders -- Younger kids can handle this, they'll just need more direction and time.)
Step 1: Students followed same instruction for creating spheres as in sphere lesson.
Step 2: Draw and even number of diagonal lines emanating from a point somewhere near the middle of the page. Remind them to "jump over" their spheres.
Step 3: Students drew curved lines inside each cone shape, alternating between "smile" and "frown" curves on every other cone.
Step 4: Place black dots in the areas to be colored black, then colored them.
Step 5: Color the rest of the shapes being careful to darken the outsides of each shape and leave the middle lightest. (High values in the middle, and low values near the edges of each shape. Sometimes I even had the students put their finger in the middle of each shape to remind them not to color that area as dark.)


Big Thanks North County Christian High School Art Students, 2010-11!!!

Friday, September 24, 2010
Op Art "Floating Spheres"
 Kids love the power of being able to create optical illusions - and they're always shocked at how easy it is! I've done this lesson with students age 11 and up. Younger students make the shapes larger, and older students have fun overlapping, etc. Here is the lesson that inspired me, and another fun Op Art lesson is here too.
Step 1: Trace some circles on paper.
Step 2: Add curved lines (we call them horizontal "smiles and frowns" & vertical "c's and backward c's - OR "longitude and latitude" lines) to turn the circle into a sphere. Younger students can make less lines.
Step 3: Draw a grid for background, and remember to "jump over" the spheres with the grid lines.
Step 4: Color shapes, leaves every other shape white b/c the negative space is necessary to help create the optical illusion.
Step 5: Add shadows on sides of spheres.


Thanks North County Christian High School art students!!!!
Tuesday, September 14, 2010
What kids say...............
 Image via Wikipedia You know those moments in the classroom when you're expecting one thing to come out of kids' mouths, but instead something wildly different appears? You know, the "stop dead in your tracks" moments trying to wrap your brain around what just happened? (I'm referring to the good ones, we can just forget about the bad ones - although they do happen too.)
Well, many moons ago I was Ed. Director at our local Performing Arts Center at the university. One of my favorite duties was leading "backstage tours" for schoolchildren. We did a short skit w/ each class, during the tour, where a couple kids went onstage and told some jokes. They were announced over house p.a., and spotlighted, etc. while their classmates sat in the audience. While the kids were preparing backstage, I would prepare the audience. I pointed to a sign and said, "Now this sign says-" and before I could finish my sentence a very young boy shouted out "APPLESAUCE!" The sign actually said "Applause". Well.....you know the rest, kids told jokes, applause sign went up, kids gave their applause ----and I couldn't wipe the smile off my face for the rest of the day:)

Subscribe to:
Posts (Atom)