Wednesday, December 29, 2010

"ME" clay boxes

My son's awesome middle school art teacher, Ms. Aird, shared this clay box lesson with me and my students finished their boxes before Christmas.  As I mentioned in an earlier post, we used Crayola Air Dry clay which is not a clay I'd recommend.  It hardens quickly and cracks and crumbles easily - but with all that being said - I think my students did a great job creating fun boxes!!!

Project Goal:  Create a box that has symbols on all 4 sides and on the lid representing your personality.

Step 1:  The students completed a worksheet answering basic questions to give them ideas for the symbols they'd put on the sides of their boxes.  (Questions such as, What do you like to do in your free time? Who are the important people in your life?  Favorite foods? Favorite time of year?, etc.)  And on the bottom of the worksheet, they had to sketch ideas for each side of their box in 3 given rectangles and 2 given squares.  You can see the worksheet in the picture above.

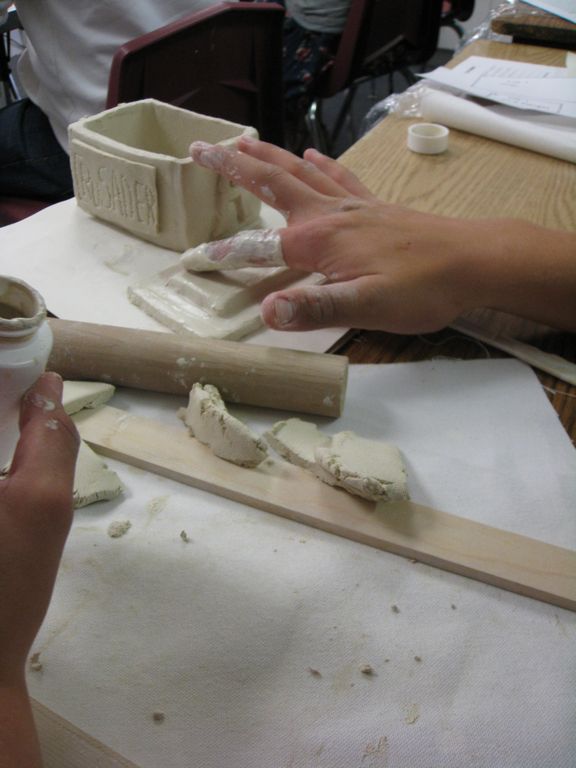
Step 2:  Each student was given a pattern of a rectangle and a square.  Using the pattern, they had to create 4 rectangles, for the bottom - long sides- and lid, and 2 squares for the short sides of the box. We used rails and wooden dowels for creating even slabs for cutting the shapes. (One class also made another small rectangle to attach to the base of the lid so it wouldn't move around and fall off the top of the box.  The other class didn't do this step b/c we ran out of clay and their lids stayed on fine.)

Step 3: Roll skinny snakes of clay to cover up and strengthen all the inside seams of the box.  Four skinny snakes pressed and smoothed into the bottom seams, and 4 more pressed into the side seams.  Use plenty of "slip" to make the seams strong and smooth.  I like to give students small medicine bottles full w/ slip, they're airtight and easy to store for future use.  You can see boy holding one in the picture above.

Step 4: Attach symbols on all four sides of box, they can be 3D or carved in.  Attach 3D symbol on lid to act as handle.  Then paint after dry.  Some of the students didn't slip and score their attached symbols well enough and they fell off, but we glued them back on.  I also sprayed the finished boxes with clear gloss sealer.


Big thanks to North County Christian High School art students!!!

Wednesday, December 15, 2010

Peppermint Candy

We drew these sweets after looking at many art examples by Wayne Thiebaud.  
Students were given the choice of using oil pastels and 6" x 9" paper, or colored pencils and 4 1/2" x 6"paper.
 To make the candy really big, I showed students how to start their drawing with a horizon line and 4 guide dots.  Then the rest of the drawing included curved lines for the top, sides, and table reflection of the candy.


Big thanks to Flamson Middle School students!

Saturday, December 11, 2010

Snowy Holiday Trees

Here's the snowy tree lesson I've shown before.  This time, instead of painting the snow, we simply added the snow with the pastels.  The painted snow is much more fun for the students, but we didn't have time this year. The steps to this lesson are here in this post from last year.


Here are the steps to this lesson.

Tuesday, December 7, 2010

Handmade Wrapping Paper

Just having some fun with some donated giant rolls of paper..............they're so heavy, I can't even move them by myself for rolling and cutting.  (Again a time in the art world where I wish my muscles were bigger - the physicality of art is so often overlooked.)  We're making Wrapping Paper and Gift Bags to sell at our Christmas Program this Friday.


We're making Wrapping Paper and Gift Bags to sell at our Christmas Program this Friday:)

Friday, December 3, 2010

Recycled & Re-usable clay tool

We're working on building some clay boxes, which are turning out really fun.  Hopefully we'll finish next week and I'll post pics.
Meanwhile, thought I'd share the scoring tools we're using on this project.  Made them from recycled plastic containers.  (By the way, I used Crayola air dry clay for this project and I DON'T recommend it.  Someone online suggested Amaco, which I can't wait to use and compare to the crackly-crumbly-more-expensive Crayola clay.  If you've used a good air-dry clay, please share.) 
Here is the way I made a recycled & reusable scoring tool for every student.  They worked great. Of course an opened up paper clip or other sharp edge will work fine too, but these seemed more special for the kids.


Then attach pieces using the rest of the "5 S's for attaching Clay"
 1.  Score
2.  Slip
3.  Slide
4.  Smush
5.  Smooth
(In case you're like I was a short time ago, and not up on clay terms.....1.  "scoring" is roughing up the pieces being attached.  2. "slip" is when you mix a little clay with water and make a wet-gluey-clay substance that helps hold pieces together.  3.  "slide" is sliding both pieces back and forth a wee bit until you can feel them locking together and resistance is present.  4. "smush" press pieces together a bit.  5. "smooth" together and erase seams.)
Big thanks to my son's 8th grade art teacher, Ms. Aird, for sharing those 5 S's with me!!!!!