Tuesday, January 26, 2010


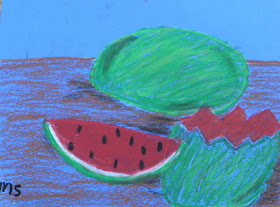
Frida Kahlo is a favorite of mine, but the pain in much of her art (& heart) can be a scary subject for kids. Then, when I came across a Frida mural lesson that Laura had posted on her wonderful blog called Painted Paper, I was inspired to do melon still lifes with my students based on Frida's painting called Viva la Vida.

This lesson was done with white crayon and oil pastels on blue paper. Because of time, we only did three melons.
First we drew our still life with pencil on scratch paper.
Then we drew our still life with a white crayon on blue paper. The white crayon doesn't show under the pastels and it saves the kids from making messy art because a number of kids get carried away erasing too many lines.
Step 1: Large oval for back melon.Step 2: Add an "open mouth with jagged teeth" for the top of the open melon.
Step 3: Draw a "U" shape under jagged-teeth mouth.

Step 4: Draw slice of watermelon in front.


Step 5: Add table line in the background.
Then color!


Great Job Santa Rosa Academic Academy, 2nd, 3rd, & 4th graders!!!

Thursday, January 21, 2010

Inspired by Faith Ringgold and Black History

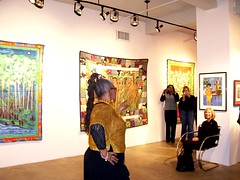
Faith's fansImage by Barbara Company via Flickr

Disclaimer - I saw a lesson online awhile ago inspired by Faith Ringgold and her book, Tar Beach. The teacher had the students use magazine squares around the edges of the paper to give the border a quilted look. To highlight Martin Luther King Jr. day, I wanted to do a similar art lesson. Well, I searched and searched and searched some more for the lesson. I looked everywhere, but do I need to tell you that this "Internet place" is huge? - it reminds me of the kind of sushi I once ate, the more I chewed and tried to swallow, the bigger it got! I searched for so long that it became a competition with myself. I didn't even care about the lesson anymore, I just wanted to find that darn place that I knew it existed. Finally, after an amount of time that I'm too embarrassed to reveal, I gave up. So below is my version of the lesson, and if you know where the Tar Beach lesson is with magazine squares for the border, please send it to me:)


This lesson is simple drawing and collage. It's based on the art piece by Faith Ringgold titled "Coming to Jones Road #4 -Under a Blood Red Sky". It depicts African American slaves sneaking their way through the night, travelling north to freedom.

We used red background paper, cut out & glued on black paper tree trunks, colored the moon - trees- and people with pastels, then glued magazines pieces around the border for a quilted look.


Thank you Flamson Middle School students.


Reblog this post [with Zemanta]

Friday, January 15, 2010

Walking California? (What kids say)

Schlepping my art materials from one classroom to another brought me a smile today.

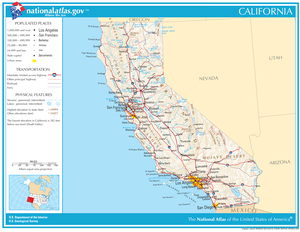
Map of CaliforniaImage via Wikipedia


A girl called out from the playground, "Hi Mrs. Smith. We're walking California!"
I asked, "What's walking California?"

She said, "Our teacher told us the distance across California and we do laps around the playground and at the end of the year some of us will have walked all the way across California!" Then she went back to skipping around the playground.

Aren't teachers just the cleverest beings?! If anyone can come up with new imaginative ways for making us "want" to exercise, leave it to a teacher. (Ha, not sure this idea would work in Texas!)

Reblog this post [with Zemanta]

Wednesday, January 13, 2010

Blob Birds

Just have to share some inspiration I got this morning........good friend Mark Krames shot me this art piece he did with his young daughter, Elliot. She painted the blobs of paint, and he turned them into birds. The cutest bird group ever, I might add - all of his illustrations have such personality! (Someday Mark may bless us with his own blog, hinty-hinty.)


Now I'm inspired to have my youngest students paint some blobs, then have my older students turn them into "things".
Ha, collaborative art is so easy to think of and so hard to execute when it comes to scheduling....we'll see, wish me luck!

Tuesday, January 12, 2010

A.K. Coomaraswamy Quote

Portrait of A. K.Image via Wikipedia

The artist is not a special kind of man, but every man is a special kind of artist.

A.K. Coomaraswamy- born Sri Lanka 1887- died in Massachusetts 1947


Curator/Fellow for Research in Indian, Persian, and Mohammedan art in the Museum of Fine Arts, Boston.

Reblog this post [with Zemanta]


Monday, January 11, 2010

Negative Space "Chairs"

George Washington's ChairImage by JCardinal18 via Flickr


Hard to believe this time last year I didn't really know what a "blog" was. Now I'm hooked on blogs! When I came across Anne Harwell's blog (love it!) called Annechovie I was thoroughly inspired by her beautiful "chair" art, so I had my students create their own "chair" art. And since the students were learning about the creation of the U.S. Constitution, we decided to draw the chair that George Washington sat in during the Constitutional Convention in 1787.

("History Alive! The United States Through Industrialism" student edition, by Teacher's Curriculum Institute /TCI)

Before we started drawing the chair, we talked about the concept of "negative space". I told the students that we would be drawing the "negative space" in the chairback to get the look of the fancy pieces of wood that make the chair. I helped them understand negative space by drawing some "positive" triangles, but then turning them into "negative" spaces after enclosing them in a box.

The end result is a "positive" space "X" and the triangles are negative spaces.


Here are some of the students' fabulous chairs. (Bummer, no time for color.)


According to the kids' textbook,
"During the convention, Benjamin Franklin wondered if the sun painted on the back of George Washington's chair was rising or setting. At the conclusion of the convention, Franklin optimistically concluded it was a rising sun."
I loved learning about the Constitutional Convention during this lesson, and I can now say I "pretty much" understand the Electoral College.
Thanks Flamson Middle School students!


Reblog this post [with Zemanta]


Tuesday, January 5, 2010

Paper Quilling

ocean quillingImage by tofutti break via Flickr


Paper Quilling* is a type of art done in Colonial times and it is a fun project that can be done with students of various ages. One tip would be to use wider paper strips for the younger kids.
Materials:
6"x9" black background paper w/ yarn attached for hanging.
1/2" strips of colored paper
pen to wrap paper around (pencils can leave ridges?)
glue


First I showed paper quill examples that I'd found on the internet. Then I created some example quills, and I drew on the board some examples of the designs the students could make by wrapping their paper around their pens.


Students were told they could make a random design, or an actual subject with their quills.


I also explained the importance of wrapping the paper "on top of itself".If they wrapped the paper NOT on top of itself, they would end up with an uneven quill that would be difficult to glue onto the background paper.


This one, below, is too uneven for gluing.
As a time management tip, I told the students they would have 20 minutes for quilling and 13 minutes for gluing. I didn't pass out the glue until after the first 20 minutes, then I collected the paper strips and students glued down the quills they'd made.


(This one above, reminds me of Matisse's "Jazz" art...I love it!)


Thank you Flamson Middle School students!!
*Hey, one of my readers just shared her website on quilling - it's fabulous - tons of inspiring designs and projects. You can visit her website here and her blog here. Thanks Whimsiquills!


Reblog this post [with Zemanta]